I ran out of balls and went shopping for more. I was disappointed that I couldn't find anything in between 2 inches and 2 1/2 inches. I guess I'll have to buy my balls from an online source. I bought some 2 inch to play with, not that I think that they will be a good size but because I will be able to do faster experiments on them. (Fewer rows and fewer pleats.)
As I was breezing through the craft aisles of the department store I was brought up short by ribbon that was exactly the colour I am looking for. It was 5/8 inch wide satin and I was fairly sure that it would be too heavy for my purposes, but I bought some to play with anyway. I made one pansy and pinned it to the antique white ball.

The pansy turned out better than I expected. Maybe I should have picked up some green ribbon too. I have ordered some more red and green rayon ribbons but if they don't work out I might end up using the satin. (After mail ordering silk and rayon ribbon from 4 different places in North America!)
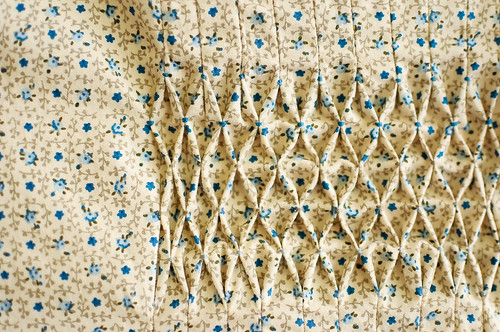
I decided that I would use some batiste to make a 2 inch ball with a tassel. (92 pleats.)

It was a very easy to stitch through but the batiste doesn't make nice crisp pleats like the polyester crepe does. If I use it again I'll make sure that I have more pleats per inch. Because I wanted a smoother look I choose not of make the fabric honeycomb between the bands of smocking. The pairs of parallel pleats remind me of the grooves on a fluted column.


So far I have not been satisfied with the pleats at the bottom of the balls made with tassels. The process of binding the threads together makes it challenging to keep the pleats straight and even.

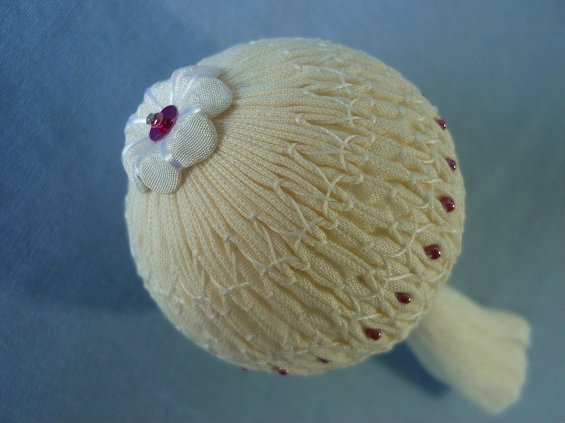
I capped the top of the ornament with a circle of gathered ribbon and a pearl bead.


Though I thought that this size ball would be too small for the ribbon pansies I pinned a few on just to see. In this photo the flowers may seem to overpower the ball but in person the size works much better than I expected.

Thursday August 9 2012
While I'm waiting for the next ribbon order to arrive I decided to try my idea of using non woven interfacing to make my marking template. I cut a strip of heavy interfacing, taped it over my paper grid and drew the lines with a fine point Sharpie marker. (This is the same set up I used in 2004 when I drew pencil lines onto my brightly printed fabric.)

The marker lines were paler than the ones I had initially drawn on the vinyl adhesive, but the ones on the vinyl adhesive are gradually wearing off. In any case I could easily see the lines through the pale yellow light weight cotton fabric that I tried. So I basted them together and made a couple of gathering lines.


As I expected the needle did tend to snag the interfacing so I had to take extra care to make sure that I didn't sew the interfacing to the fabric.
I decided that I wanted to give the tasseled ornament another try so I cut a wider strip of yellow fabric and made gathering lines. This time I frayed the fabric before I gathered the threads and I also fitted the gathered fabric to the ball in a different order. (I gathered the bottom thread first, then I gathered the second thread from the top and then I gathered all of the other threads.)

I'm much more satisfied with the bottom of this ornament.

However, the unravelled cotton threads wanted to formed dreadlock-like clusters and it took a long time to tame them into a neat tassel, so I won't be repeating this exercise with this type of fabric.
Tuesday August 14 2012
I just made an interesting discovery. On my polyester crepe fabric the vertical threads, the ones parallel to the selvedge are fuzzier than the horizontal threads. In the photo below I pulled both of the threads between my fingernails. The horizontal one is on the left.

I frayed a two inch strip to make a small, but tidy, tassel.

Now I'd like to try making a smocked ball from a vertical strip of the crepe fabric and to see if the horizontal threads will make a tidier tassel. Right now I don't have a big enough piece of fabric to try this out. Which makes me wonder about the vertical threads on the cotton fabrics...
Thursday August 17 2012
My ribbon order arrived today. (Well actually this is Hug Snug rayon seam binding.) The good news is that I like the weight, width, drape and slight sparkle of this ribbon. And the green ribbon could work on this project. The disappointing news is that the ribbon I hoped would be dark burgandy is a lighter colour than the wine coloured rayon ribbon I already have. It is not as dark as the burgandy satin ribbon.
I decided that I should catalog the ribbon I have before it all gets muddled up in my mind. Let's see there's...

A) Hanah Silk bias cut 5/8 inch wide ribbon
B) HDF 4mm and 13 mm wide silk ribbon
C) Vintage rayon 1/2 inch and 9/16 inch wide ribbon
D) Offray polyester 5/8 inch wide single sided satin ribbon and
E/ Hug Snug 9/16 inch wide rayon seam binding

A) Hanah Silk - 1. Briar Rose 2. Overdyed Briar Rose 3. Sea Goddess
B) HDF Silk - 1. BeCherished 2. Steppes of Kail 3. Steppes of Alluvium
C) Vintage Rayon - 1. Basque Red 2. Posie 3. Moss Green/ Alp Green/ Mode Green
D) Offray Satin - 1. Burgandy 2. Moss
E) Hug Snug Seam Binding - 1. Medoc 2. Dark Olive Green
(All of the gold ribbon are HDF 3mm BeMaized or BeGuilted.)
And here is how the newest ribbon, the Hug Snug, worked up.

Now if the Hug Snug came in the same burgandy colour as the Offray satin I would be ready to roll!
No comments:
Post a Comment