Showing posts with label ribbon pansies. Show all posts

September 14

Friday September 14 2012

Well I decided to do the three band ornament, sans tassel, and I smocked three of them. But then I began to have doubts. I really like the pattern but I'm beginning to suspect that the polyester crepe fabric is too soft to make maintain nice crisp pleats between the rows. Rather than make a decision I decided to forge on with getting the balls ready to smock.

I plan to make 17 smocked ornaments for Christmas gifts so I've decided to prepare that many before I decide. As of today I have 3 smocked and 10 ready to smock.

pansy project
I have also made a decision about the ribbon. The burgundy Hug Snug samples I received confirmed that the one I have is Medoc. I also received a sample of Tropic Wine. It is quite a bit browner (something like DMC 902) but it works well behind the Medoc. I didn't receive any green Hug Snug samples that I liked better than the Dark Olive. (Which is something like DMC 3787.) In a perfect world I'd have found one more like the Moss coloured satin one but the Dark Olive will work well enough.

The lengths I plan to use are:

Medoc- 7 inches
Tropic Wine- 6 1/2 inches
Dark Olive- 4 1/4 inches

Photobucket

Monday September 17

I now have 3 balls smocked and 14 ready to smock. I also have 2 "experiments" that I can fix up for our tree or, in a pinch, use as gift ornaments.

Photobucket

Friday September 21 2012

If I include the 2 experiments I now have 12 smocked and 7 ready to smock. I hope that the Tropic Wine ribbon is in my mailbox this morning. I'd like to make a few pansies before I smock the rest.


P.S. I was happy to find the Tropic Wine and Dark Olive ribbons in my mailbox this morning and I quickly set about pressing them. I was surprised to discover that there was only 26 feet (instead of 30 feet) of the Tropic Wine. Now I'm hesitating to start using it in case the seller won't be able to supply the missing 4 feet of ribbon.  Without it I'll have to use 6 inches instead of 6 1/2 inches and I won't have enough left to make an ornament for our tree. I'm crossing my fingers for a positive response from the seller.

I guess until I know I best keep smocking.

Thursday September 27 2012

I found out this week that there is a possibility that I'll have a visitor on Friday who can transport 3 of the ornaments, and save me some postage. So on Tuesday I made a quick trip to town to buy some gift wrapping supplies. I also finished smocking the 17th ball on Tuesday. (Whew!)

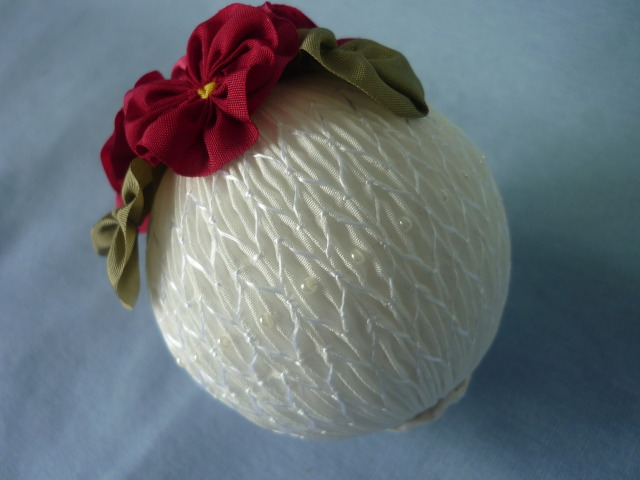
I spent a good chunk of Wednesday making and installing the pansies and leaves. It took much longer than expected, partially because just as I was finishing the 9th set of front petals I spilled Fray Stop on two of them. Despite my best effort to clean them they weren't salvageable.

Photobucket

So I had to make two more petals before I carried on. Eventually I had all the pansies, leaves and end caps done and I was ready to assemble the first gift ornament.

Photobucket

(The whole time I've been working on this project I had been pondering ways to evenly space the leaves around the top. I imagined using a small triangle, or a circle divided into three sections. When it came time to do it I realized that the smocking pattern has 27 diamonds at the top. All I had to do was to place a pin in every ninth diamond and then place the center line of each leaf along the pleats that run from the top of the diamond to the top of the ornament.)

I stuck the point of each leaf to the ball using a drop of FabricTac glue.

Photobucket

I used double sided tape to attach the green ribbon to the flat buttons. Two pins hold the button to the ball.

Photobucket

Each flower was centered between two leaves. They are stuck in place using a dot of FabricTac glue.

Photobucket

I gathered two layers of the light weight polyester crepe fabric over the 18 mm bead cap before I added the rayon thread. I applied a bit of FabricTac to the underside and then used a pearl head pin to stick it to the bottom of the ball.

Photobucket

I got about 2 1/2 of the gift ornaments assembled before I spilled the Fray Stop again. This time it was a brand new spool of thread that soaked it up. I put the Fray Stop in another room and decided to quit for the night. Frankly I was more than a little discouraged with both the process and the look of the ornaments. (I cheered up when I found an email from the person who sold me the Tropic Wine seam binding. She wrote to say that she'll send me another 10 yards!)

Friday September 28th 2012

This morning I finished the third ornament.

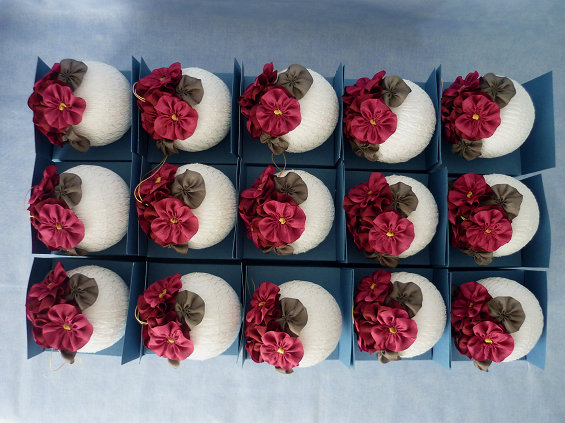
When it was done I decided to take some glamour photos before I wrapped them up. By the time I was finished the photo shoot I was feeling a lot better about the look of the ornaments.

Photobucket

Photobucket

Photobucket

Here they are with the other smocked balls.

Photobucket

And then I had to quickly whip up some gift boxes. When I bought the blue card stock and white ribbon I pictured a snowflake sticker holding the ribbon to the box. However after looking in three stores I concluded that there probably won`t be any suitable snowflake stickers in my local shops until after Hallowe'en. So I purchased a piece of card stock with a snowflake design instead.

Here are the two boxes I made from the first sheet of card stock. The cut out snowflake seemed a bit flat so I added a little white button.

Photobucket

Photobucket

Photobucket

Thursday October 4th 2012

Three ornaments went on their merry way last weekend and I almost finished the rest of the ornaments this week. I now have 16 gift ornaments completed. When the Tropic Wine seam binding arrives I'll be able to make the back petals that I need to finish two more. (One additional gift ornament and one for our tree.)

Photobucket

Friday October 5th 2012

No seam binding in the mailbox this morning so I guess I'll make some boxes this weekend. But first I thought I should take a progress photo against a background that provides better contrast.

Photobucket

Thursday October 11th 2012

I'm sorry to say that my missing seam binding has not yet arrived. Since I couldn't finish the last two ornaments I got busy making more gift boxes instead. (I took some step by step photos for a future tutorial.)

Photobucket

Sunday October 14th 2012

Here's hoping that the seam binding will be in my mailbox tomorrow. This morning I put away everything that I won't need to finish the last three ornaments. Many months of play left me with many bits and pieces and it took some time to find room for everything. Especially all of the new ribbon and experimental balls.

This afternoon I made a quick tutorial to explain how I make two gift boxes from a single piece of 12 x 12 inch card stock. You can click on the photo below if you would like to see the whole tutorial.

Photobucket

Wednesday October 17th 2012

Guess what!

Photobucket

Photobucket

Photobucket

551

Thursday October 18th 2012

625

(It is still too early to find snowflake stickers in the store so I printed some clip art flakes on photo paper. If I don't find stickers in November I'll stick these ones in place.)

Friday October 19th

It has just occurred to me that my "how to" links are now buried on the back pages of this blog. I'll list them here. (And also on the right side of this page.)

Some general information about how I make my smocked ball ornaments.
http://pinwheelponders.blogspot.ca/2009/02/some-thoughts-on-smocked-ornaments.html

My smocked ball tutorial.
http://pinwheelponders2.blogspot.ca/2012/08/my-seemingly-seamless-smocked-ball.html

Ribbon Pansy Tutorials
http://nostalgicneedleart.blogspot.ca/2008/03/ribbon-pansies.html

http://creativeribbons.blogspot.ca/2007/10/wired-ribbon-pansytutorial.html

Boxes from Cardstock tutorial
http://pinwheelponders2.blogspot.ca/p/i-made-these-boxes-using-12-x-12-card.html

August 19

Sunday August 19 2012

I'm waiting for the mail again. A very kind person, Maggi, has purchased some 2-1/4" balls for me and they are on the way. And a company that sells the Hug Snug ribbon is sending me some colour samples. (I'm not 100% convinced that "Medoc" I recieved is Hug Snug's darkest burgundy ribbon.) That meant that I had no excuse not to take the time to finally do a proper tutorial for my "seemingly seamless" smocked ball ornaments. I finished it today. If you'd like to visit it you can click on the picture below.

864

And once that was done I thought I'd try my hand at making ruched ribbon rosettes.

Photobucket
.
Click here to see the blog where I found the tutorial. The only change I made is that I used 8-1/2 inches of ribbon to make a rosette with 8 petals.

Friday August 24 2012

While I was waiting for the balls and ribbon samples to arrive I decided to try the smocked pattern I used on the batiste ball on a larger ball. (I really do like look of the parallel pleats.) I no longer had any balls between 2 inches and 2-1/2 inches so I took apart an ornament I made in 2004. It used a 55 mm ball, which is my favourite size.

Photobucket

I liked the size but I find the rayon threads look a bit untidy.

I also decided to make a new grid for making the gathering stitches on semi- transparent fabric. The interfacing one was less than ideal because the needle did snag on the interfacing and when it did I think it sometimes left ink coloured fibres on the fabric strip. I made a new grid by printing some of my grid paper and covering it with clear adhesive vinyl.

Photobucket

The instructions for making this grid are about halfway down the following blog page.

http://pinwheelponders.blogspot.ca/2009/02/some-thoughts-on-smocked-ornaments.html

Saturday September 1 2012

With Christmas now less than 4 months away it is time to fish or cut bait.

I couldn't make any firm decisions on the ribbons because the envelope of samples I received this past Monday had the green but not the burgandy colours. However, I received the styrofoam balls that Maggi sent so there was no reason I couldn't choose the size of the ball and the pattern of the smocking.

I asked my "inhouse focus group" to choose between two smocking patterns. This one,

Photobucket

and the most recent one.

Photobucket

Despite my hints that the first one was tidier and easier to stitch the vote was:

Most recent 3 band ornament - 2 votes
Simpler ornament - 1 vote

So I decided to see if I could improve on the three band ornament.

I think the most untidy part of this pattern are the bracket-like stitches I make below the slanted stitches. The rayon thread is just too soft to make nice arcs. So I tried some bracket-free patterns, that still made parallel columns between the bands, but I couldn't find one that I liked. I tried using all DMC Perle thread, but it didn't have the sparkle of the rayon thread.

So I made a 2 1/4 inch (108 pleat) ball that used rayon for the slanted stitches and the stiffer Perle thread for the bracket stitches. In the photo below this ball is on the left and the 2 inch batiste ball with all rayon thread is on the right. Though it probably doesn't show on the photo the new ball with the combination of threads does look neater.

Photobucket

I just wish that it was the same size as the 55 mm ball. (Far right in the photo below.)

Photobucket

So after smocking 15 ornaments my choices are either the three band one on the left or the simpler one the right. The one on the right would be a lot faster because it is just six rows of slanted stitches. The one of the left has four rows of slanted stitches and four rows of bracket-like stitches. And the bracket-like stitches take more time because I have to try to keep the height of the arc the same size on each one.

Photobucket

It is tempting to choose the easier project, perhaps because I have already smocked almost as many experiments as I plan to give as Christmas gifts!

By the way I used a vertical strip of fabric to make the most recent ornament, so that I could use the stronger straighter horizontal threads to make the tassel. The tassel was much easier to fray, because the removed threads never broke, and it isn't fuzzy like the previous tassels.

I've decided that I like the pansy capped ornaments better without a tassel so I won't be making any more tassels for this project. However should I wish to make a tasselled ball in the future I'll first check the vertical and horizontal threads to see which will be more suitable for a tassel. I'll make the ball by fraying the fabric before I gather the threads.

Photobucket

And I'll gather the bottom of the ornament to the "just right" sized circle before I gather the top thread.

Photobucket

August 6

Monday August 6 2012

I ran out of balls and went shopping for more. I was disappointed that I couldn't find anything in between 2 inches and 2 1/2 inches. I guess I'll have to buy my balls from an online source. I bought some 2 inch to play with, not that I think that they will be a good size but because I will be able to do faster experiments on them. (Fewer rows and fewer pleats.)

As I was breezing through the craft aisles of the department store I was brought up short by ribbon that was exactly the colour I am looking for. It was 5/8 inch wide satin and I was fairly sure that it would be too heavy for my purposes, but I bought some to play with anyway. I made one pansy and pinned it to the antique white ball.

Photobucket

The pansy turned out better than I expected. Maybe I should have picked up some green ribbon too. I have ordered some more red and green rayon ribbons but if they don't work out I might end up using the satin. (After mail ordering silk and rayon ribbon from 4 different places in North America!)

I decided that I would use some batiste to make a 2 inch ball with a tassel. (92 pleats.)

Photobucket

It was a very easy to stitch through but the batiste doesn't make nice crisp pleats like the polyester crepe does. If I use it again I'll make sure that I have more pleats per inch. Because I wanted a smoother look I choose not of make the fabric honeycomb between the bands of smocking. The pairs of parallel pleats remind me of the grooves on a fluted column.

Photobucket

Photobucket

So far I have not been satisfied with the pleats at the bottom of the balls made with tassels. The process of binding the threads together makes it challenging to keep the pleats straight and even.

Photobucket

I capped the top of the ornament with a circle of gathered ribbon and a pearl bead.

Photobucket

Photobucket

Though I thought that this size ball would be too small for the ribbon pansies I pinned a few on just to see. In this photo the flowers may seem to overpower the ball but in person the size works much better than I expected.

Photobucket

Thursday August 9 2012

While I'm waiting for the next ribbon order to arrive I decided to try my idea of using non woven interfacing to make my marking template. I cut a strip of heavy interfacing, taped it over my paper grid and drew the lines with a fine point Sharpie marker. (This is the same set up I used in 2004 when I drew pencil lines onto my brightly printed fabric.)

interfacing

The marker lines were paler than the ones I had initially drawn on the vinyl adhesive, but the ones on the vinyl adhesive are gradually wearing off. In any case I could easily see the lines through the pale yellow light weight cotton fabric that I tried. So I basted them together and made a couple of gathering lines.

Photobucket

Photobucket

As I expected the needle did tend to snag the interfacing so I had to take extra care to make sure that I didn't sew the interfacing to the fabric.

I decided that I wanted to give the tasseled ornament another try so I cut a wider strip of yellow fabric and made gathering lines. This time I frayed the fabric before I gathered the threads and I also fitted the gathered fabric to the ball in a different order. (I gathered the bottom thread first, then I gathered the second thread from the top and then I gathered all of the other threads.)

Photobucket

I'm much more satisfied with the bottom of this ornament.

Photobucket

However, the unravelled cotton threads wanted to formed dreadlock-like clusters and it took a long time to tame them into a neat tassel, so I won't be repeating this exercise with this type of fabric.

898

Tuesday August 14 2012

I just made an interesting discovery. On my polyester crepe fabric the vertical threads, the ones parallel to the selvedge are fuzzier than the horizontal threads. In the photo below I pulled both of the threads between my fingernails. The horizontal one is on the left.

Photobucket

I frayed a two inch strip to make a small, but tidy, tassel.

Photobucket

Now I'd like to try making a smocked ball from a vertical strip of the crepe fabric and to see if the horizontal threads will make a tidier tassel. Right now I don't have a big enough piece of fabric to try this out. Which makes me wonder about the vertical threads on the cotton fabrics...

Thursday August 17 2012

My ribbon order arrived today. (Well actually this is Hug Snug rayon seam binding.) The good news is that I like the weight, width, drape and slight sparkle of this ribbon. And the green ribbon could work on this project. The disappointing news is that the ribbon I hoped would be dark burgandy is a lighter colour than the wine coloured rayon ribbon I already have. It is not as dark as the burgandy satin ribbon.

I decided that I should catalog the ribbon I have before it all gets muddled up in my mind. Let's see there's...

Photobucket

A) Hanah Silk bias cut 5/8 inch wide ribbon
B) HDF 4mm and 13 mm wide silk ribbon
C) Vintage rayon 1/2 inch and 9/16 inch wide ribbon
D) Offray polyester 5/8 inch wide single sided satin ribbon and
E/ Hug Snug 9/16 inch wide rayon seam binding

Photobucket

A) Hanah Silk - 1. Briar Rose 2. Overdyed Briar Rose 3. Sea Goddess

B) HDF Silk - 1. BeCherished 2. Steppes of Kail 3. Steppes of Alluvium

C) Vintage Rayon - 1. Basque Red 2. Posie 3. Moss Green/ Alp Green/ Mode Green

D) Offray Satin - 1. Burgandy 2. Moss

E) Hug Snug Seam Binding - 1. Medoc 2. Dark Olive Green

(All of the gold ribbon are HDF 3mm BeMaized or BeGuilted.)

And here is how the newest ribbon, the Hug Snug, worked up.

Photobucket

Now if the Hug Snug came in the same burgandy colour as the Offray satin I would be ready to roll!